Cloudinary AI Skill for SQA: Auto-Upload Screenshots Explained
Table of Contents
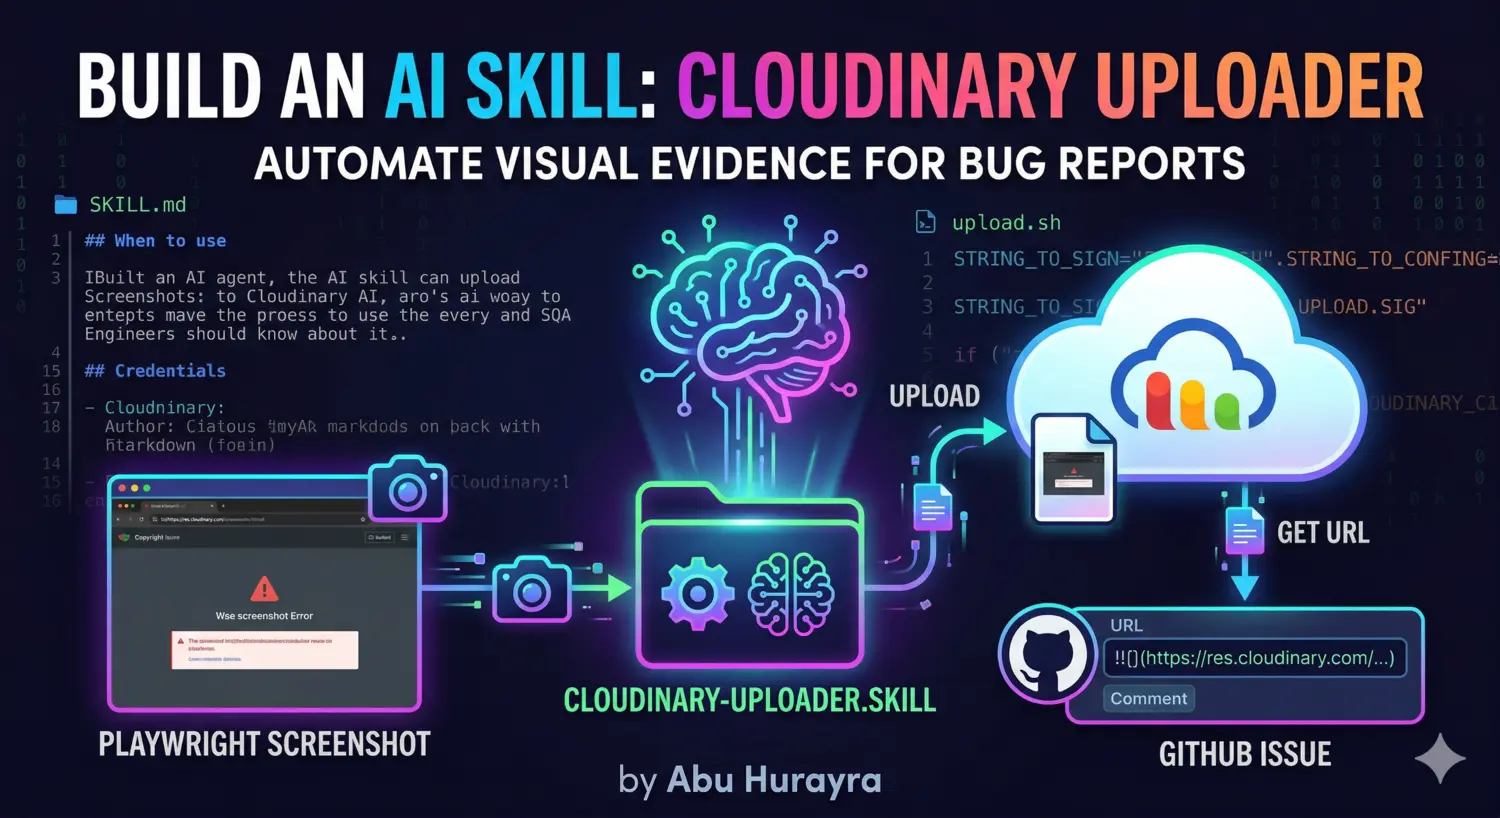
As an SQA engineer, one of my most tedious daily tasks used to be this:
- Run a Playwright test
- A screenshot gets saved somewhere on disk
- Copy it somewhere accessible
- Upload it manually to a hosting service
- Paste the link into a GitHub issue
Every single time. For every bug. I finally automated this entire chain using something called an AI skill — specifically, a Cloudinary uploader skill I built myself. In this post I’ll explain what AI skills are, why I needed this one, how I built it, and how you can use it too.
What Are AI Skills?
AI skills are reusable, portable instruction sets for AI agents. Think of them as plugins — you write a SKILL.md file that tells the AI what the skill does, when to use it, and how to invoke it. Once placed in the right directory, Claude Code (and other compatible tools) automatically discovers them and makes them available in every session.
The format comes from the OpenCode specification. A skill lives in a folder named after it, and the folder contains at minimum a SKILL.md file:
~/.agents/skills/
  cloudinary-uploader/
    SKILL.md
    scripts/
      upload.sh
The SKILL.md has YAML frontmatter followed by instructions written in plain English (or whatever language your agent understands):
---
name: cloudinary-uploader
description: Upload local images, videos, and files to Cloudinary and return their direct URL.
---

## When to use

Use this skill whenever you need to upload a local file and get a public URL back...
Claude reads this file, understands the capability, and knows to invoke it when you ask to upload a file or attach visual evidence to a GitHub issue. No extra configuration needed per project.
Where Claude Code looks for skills:
- Global (available everywhere):
~/.agents/skills/<name>/SKILL.mdor~/.claude/skills/<name>/SKILL.md - Project-local (scoped to one repo):
.claude/skills/<name>/SKILL.mdor.agents/skills/<name>/SKILL.md
Global skills are the right choice for tools you use across all your projects — like a screenshot uploader.
Why I Needed This
My day-to-day testing workflow involves:
- Playwright for browser automation and end-to-end tests
- GitHub issues for tracking bugs with visual evidence
- Claude Code with the
playwright-cliskill for AI-assisted browser interactions
The playwright-cli skill is great — I can ask Claude to navigate a page, interact with elements, and take screenshots. But after the screenshot lands on disk, the workflow broke. To attach it to a GitHub issue, I either had to manually upload it somewhere or paste a local path that nobody else could see.
Visual evidence is non-negotiable in SQA. A screenshot of a broken layout, a video of a flaky test, a diff image — these are what make bug reports credible and actionable. Without a hosted URL, they’re useless in a GitHub comment.
I needed the AI to handle the full loop: take a screenshot → upload it → hand me the URL → embed it in the issue. That required a skill.
How I Built It
The skill has two parts: a SKILL.md instruction file and an upload.sh bash script.
The SKILL.md
This is what the agent reads. It explains:
- When to invoke the skill (uploading files, getting public URLs, preparing visual evidence for GitHub issues)
- How credentials are resolved (from environment, rc files, or
.env— never hardcoded) - How to invoke the script (pass one or more file paths)
- How to format the output (images as
, other files as[text](URL))
The instructions are intentionally specific. The agent doesn’t have to guess — it knows exactly what the script outputs and how to use it.
The upload.sh Script
The script does the actual work. Here’s what it handles:
Credential resolution — It checks (in order):
CLOUDINARY_URLalready in the current environment- A targeted
grepof~/.zshrc,~/.bashrc, or~/.profile— without sourcing them, which would run all yournvm/rbenv/prompt setup code .envfiles in the current directory,$HOME/.env, or$HOME/.cloudinary
Signing the request — Cloudinary’s upload API requires a signed request. The script computes a SHA-1 signature from the parameters + your API secret:
STRING_TO_SIGN="public_id=${PUBLIC_ID}×tamp=${TIMESTAMP}${API_SECRET}"
SIGNATURE=$(_sha1 "$STRING_TO_SIGN")Collision-safe public IDs — Every upload is prefixed with a YYMMDD_HHMMSS_ timestamp so filenames never overwrite each other:
260405_143022_login-error-screenshotFile size guard — Files over 10 MB are skipped with an error. The Cloudinary free plan has limits, and quietly uploading a 50 MB video recording is how you blow through them in one session.
Flexible JSON parsing — The script uses jq if available, falls back to python3, and has a grep-based last resort for minimal environments.
Batch support — Pass multiple files and it loops through all of them, printing one URL per line.
The full script is under 180 lines of bash with no external dependencies beyond curl and sha1sum/shasum (both available by default on macOS and most Linux distros).
How This Changed My Workflow
The difference is most visible in three scenarios:
1. Playwright Screenshot Evidence
When I use the playwright-cli skill to test a page, I can now say:
“Take a screenshot of the checkout page after adding item X to the cart, upload it, and attach it to GitHub issue #47.”
Claude takes the screenshot, invokes the Cloudinary skill, gets the URL, and includes it directly in the GitHub issue body — all in one go. No tab switching, no manual upload, no copying URLs.
2. Bug Reports with Visual Proof
When I find a UI regression or a broken layout, the entire report flow becomes:
me: Upload this screenshot and create a GitHub issue with it as evidence
AI: [uploads screenshot] [creates issue with embedded image]
The image is hosted on Cloudinary’s CDN, loads fast, and is permanently accessible — unlike a local file path or a Slack attachment that expires.
3. Batch Upload for Test Run Artifacts
After a full test run that produces a dozen screenshots, I can ask Claude to upload all of them at once:
me: Upload all screenshots from the last test run and give me the URLs
AI: [batch uploads] [returns list of URLs]
How You Can Use It Too
Step 1: Get a Free Cloudinary Account
Sign up at cloudinary.com. The free plan gives you 25 GB of storage and 25 GB of monthly bandwidth — more than enough for screenshot uploads. You don’t need a credit card.
After signing up, go to your Dashboard and find your API Environment variable. It looks like:
CLOUDINARY_URL=cloudinary://123456789012345:your_api_secret_here@your_cloud_nameStep 2: Set Your Credentials
Add the CLOUDINARY_URL to your shell profile so the script can find it:
# Add to ~/.zshrc or ~/.bashrc
export CLOUDINARY_URL="cloudinary://API_KEY:API_SECRET@CLOUD_NAME"
Or if you prefer to keep it out of your shell profile, create ~/.cloudinary:
CLOUDINARY_URL=cloudinary://API_KEY:API_SECRET@CLOUD_NAMEThe script checks all of these locations automatically. You never pass credentials as arguments — they’re always read from your environment.
Step 3: Create the Skill Directory
mkdir -p ~/.agents/skills/cloudinary-uploader/scriptsStep 4: Create the SKILL.md
Create ~/.agents/skills/cloudinary-uploader/SKILL.md with this content:
---
name: cloudinary-uploader
description: Upload local images, videos, and files to Cloudinary and return their direct URL.
---
# Cloudinary Uploader
This skill enables AI agents to upload local images, videos, and files directly
to Cloudinary so you can easily share public links in chats, documentation,
or format them as visual evidence for GitHub issues.
## When to use
Use this skill whenever you are asked to:
- Upload a local file (screenshot, image, video, log file) to Cloudinary.
- Get a public URL for a local file.
- Prepare visual evidence or assets to attach to a GitHub issue.
- Batch upload multiple files at once.
## Credentials
The script reads CLOUDINARY_URL from (in order):
1. The current environment
2. A targeted grep of ~/.zshrc, ~/.bashrc, or ~/.profile (no sourcing)
3. A .env file in the current directory, ~/.env, or ~/.cloudinary
Expected format: cloudinary://<API_KEY>:<API_SECRET>@<CLOUD_NAME>
## Instructions
1. Identify the file path(s) to upload.
2. Run the upload.sh script in the scripts/ directory of this skill.
3. The script prints the direct URL(s) to stdout (one per line).
4. Format URLs in Markdown:
- Images: 
- Videos/other files: [Description](URL)Step 5: Create the upload.sh Script
Create ~/.agents/skills/cloudinary-uploader/scripts/upload.sh and paste the script content. The full script is available in my skills repository — or you can write your own using the structure I described above.
Make it executable:
chmod +x ~/.agents/skills/cloudinary-uploader/scripts/upload.shStep 6: Verify It Works
Test the script directly before relying on the AI to invoke it:
~/.agents/skills/cloudinary-uploader/scripts/upload.sh /path/to/test-image.pngIf credentials are set correctly, you’ll see a Cloudinary URL printed to stdout. If something is wrong, the error message will tell you exactly what failed — missing credentials, wrong format, network error, or file size limit exceeded.
Combining With Other Skills
The real power shows up when you chain skills together. My current workflow for bug reporting combines three skills:
playwright-cli— Navigate the page and take a screenshotcloudinary-uploader— Upload the screenshot and get the URLgithub-issue-creator— Create the GitHub issue with the image embedded
None of these skills know about each other — Claude orchestrates them based on context. I just describe what I want and the agent figures out which skills to invoke and in what order.
This is exactly the kind of workflow that used to require custom tooling or glue scripts. Now it’s a few SKILL.md files in a directory.
A Note on Security
A few things worth knowing before you set this up:
- Never hardcode credentials. The script is designed to read
CLOUDINARY_URLfrom your environment, not accept it as an argument. This keeps secrets out of shell history and process lists. - The free plan is public by default. Anything you upload to Cloudinary is publicly accessible via its URL. Don’t upload screenshots containing sensitive data (passwords, API keys, PII) without configuring private delivery on a paid plan.
- The script never sources your shell files. It uses targeted
grepto extract the variable — this avoids running any initialization code from your rc files.
Why This Matters for SQA Engineers Specifically
Most AI productivity content focuses on developers. But SQA engineers have a specific workflow challenge: we produce a lot of binary artifacts (screenshots, videos, HAR files) and we need those artifacts embedded in human-readable reports and issue trackers.
Text-based AI tools handle text beautifully. The gap has always been at the boundary between disk files and the web. AI skills bridge that gap — you write the bridge once, as a SKILL.md + a script, and every future session has access to it automatically.
The Cloudinary skill took me an afternoon to write and test. Since then it’s saved me time on every single bug report.
If you’re using Claude Code for testing workflows, I’d strongly encourage you to look at what repetitive steps you’re still doing manually. There’s a good chance a short skill file is all it takes to hand that task off entirely.
Have questions about setting this up or want to share a skill you’ve built? Feel free to reach out.
If you found this post helpful, consider buying me a coffee. It keeps me writing!
